


Network Cabling Help - Copyright © 2016 - All rights reserved. - Privacy and Cookie Policy


A guide to the method of joining fibers
Fusion Splicing
There are several reasons for splicing a fiber cable, these include: • To join two fibers due to a breakage. • To connect some of the cores straight through a patch cabinet. • To extend a cable run. • To reduce losses, a fusion splice has much lower losses than two connectorized cables joined through a coupler.
•
Or to attach a pre-terminated pigtail.
A Pigtail is a short length of fiber with a factory fitted and polished connector. In the past these were used
in preference to field terminations because of the complexities at the time of manually terminating optical
fibers. These days pigtails are mainly used where the environment isn't suitable for manual terminations
or where speed is a factor.
As with all fiber termination methods, safety is very important so first some safety tips.
•
Always work in a clean and tidy area.
•
Fiber offcuts are hard to see and can easily penetrate the skin especially if they get into your
clothes, so care must be taken to ensure the safe disposal of all offcuts. Dispose of fiber scraps
immediately using a suitable container and do not throw into a waste paper bin.
•
Because of the dangers of ingesting a fiber, do not eat or drink in the termination area.
•
Fusion splicers use an electric arc to fuse the fibers together so they should never be used in an
environment where flammable gases or liquids are present.
•
Never look into the end of a live fiber connector. Holding some multimode fibers up to a piece of
paper may prove the presence of light and therefore prove that it is live, but it doesn't prove that it
isn't live! Some laser powered equipment use light which is outside of the visible spectrum, so err
on the side of caution.
connectorized cables joined through a coupler.
•
Or to attach a pre-terminated pigtail.
A Pigtail is a short length of fiber with a factory fitted and polished connector. In the past these were used
in preference to field terminations because of the complexities at the time of manually terminating optical
fibers. These days pigtails are mainly used where the environment isn't suitable for manual terminations
or where speed is a factor.
As with all fiber termination methods, safety is very important so first some safety tips.
•
Always work in a clean and tidy area.
•
Fiber offcuts are hard to see and can easily penetrate the skin especially if they get into your
clothes, so care must be taken to ensure the safe disposal of all offcuts. Dispose of fiber scraps
immediately using a suitable container and do not throw into a waste paper bin.
•
Because of the dangers of ingesting a fiber, do not eat or drink in the termination area.
•
Fusion splicers use an electric arc to fuse the fibers together so they should never be used in an
environment where flammable gases or liquids are present.
•
Never look into the end of a live fiber connector. Holding some multimode fibers up to a piece of
paper may prove the presence of light and therefore prove that it is live, but it doesn't prove that it
isn't live! Some laser powered equipment use light which is outside of the visible spectrum, so err
on the side of caution.
Overview
A fusion splice is a way of joining two fiber cores by
melting the ends together using an electric arc. A
splicing machine is used because an extremely high
degree of accuracy is needed, the machine first has
to align the cores and then apply the exact amount of
heat to melt the ends before pressing them together.
Splicing can be carried out using a mechanical splice
but these only hold the fiber ends together, precisely
aligned but not permanently joined.
There are four basic steps to fusion splicing
1.
Strip back all coatings down to the bare fibers and clean using isopropyl alcohol.
2.
Cleave the fibers using a precision cleaving tool and put the heat shrink tube on to one of the ends.
3.
Fuse the fibers together in the fusion splicer.
4.
Put the heat shrink protector on the fiber joint.
Fusion Splicing Method
Stripping
Strip back the external sheathing of the cable using a rotary stripping tool. Cut back the aramid strength
member using ceramic or kevlar scissors.
Strip the primary buffer from the fiber using fiber
strippers not ordinary wire strippers. Do this a small
section at a time to prevent the fiber breaking, about
10mm (3/8 in) on each cut is fine until you get used
to it. Strip back about 35mm (1.5 in).
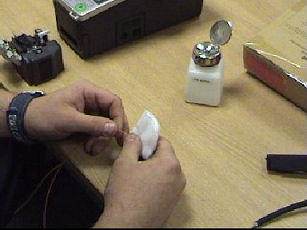
Clean the bare fiber with a lint free wipe and
isopropyl alcohol, it will "squeak" when it is clean.
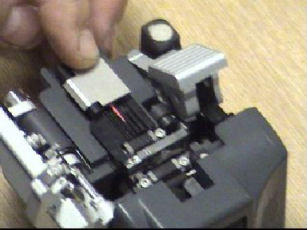
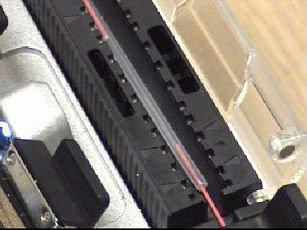
Cleaving
The cleaver first scores the fiber and then pulls the
fiber apart to make a clean break. It is important that
the the ends are smooth and perpendicular to get a
good joint, this is why a hand held cleaver will not do.
Cleavers vary from manufacturer to manufacturer and
you should read the instructions for the one you are
using. Basically the operation consists of putting the
fiber into the groove and clamping, then close the lid
and press the lever. Easy eh!
Good cleaving tools can cost between $800 to $3000
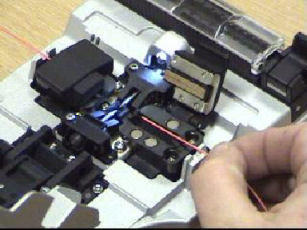
The Fusion Process
Once the fiber ends are prepared they are placed in
the fusion splicer. Press the button and the machine
takes care of the rest of the fusion process
automatically.
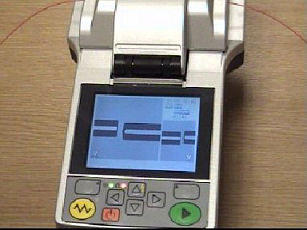
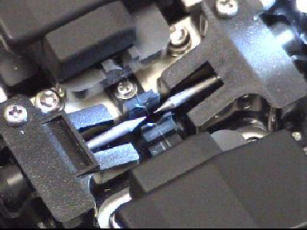
First the two fibers are aligned, you can see this on
the photo where a much magnified image shows the
two fiber ends. The display also shows how well the
cleaver does its job of producing a perfect 90 degree
cut.
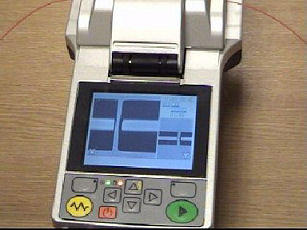
If you watch very carefully in the video you can see
the X and Y alignment that takes place. The splicer
aligns the fibers on one axis and then from another
camera angle set at at 90 degrees, it aligns the other
axis. This high precision alignment is critical for a low
loss joint, any mismatch of the fiber cores will
significantly reduce the propagation of light through
the joint.
Bearing in mind that we are dealing with two very
small glass rods of only 125 microns in diameter, it
brings it home as to how extremely accurate these
machines are.
Once the fibers are aligned the splicer fires an
electric arc between the two ends which melts them
immediately and pushes them together, or fuses
them into one piece of fiber.
The fusion splicer then tests for dB loss and tensile
strength before giving the "OK" beeps for you to
remove the splice from the machine.
Protection
The splicer in the video has a built in heat shrink
oven, so when the fiber is taken out of the machine
the protective tube is slid into place and the whole
assembly is put into the oven to shrink the tube on to
the splice.
The protective tube gives physical protection to the
splice and further protection is provided by placing
the splice into a splice tray.
Once all of the fibers have been joined the whole
tray is then fixed into a splice box which protects the
cable joint as a whole and the cable clamps are then
tightened to prevent any external forces from pulling
on the splices.
Fusion splicers are expensive and can cost between
about $5,000 to over $30,000, so you need to be
doing a lot of splicing to justify the initial outlay but,
for a low loss and relatively fast connection it is the
only tool for the job.
Fusion Splicing a Fiber Optic Cable