


Network Cabling Help - Copyright © 2016 - All rights reserved. - Privacy and Cookie Policy


. . . with an SC connector using the cold cure method.
Cold Cure Termination
There are several different methods of terminating fiber cables including heat-cured, cold cured, pre-injected epoxy, UV adhesives and crimped termination's. There are also environmental conditions to take into consideration, but for the purpose of this
tutorial we will discuss the cold cure method as it is the most widely used system
and probably the easiest to learn. It is also preferable on site as it doesn't require a
power source for ovens and fusion splicers.
As with all fiber termination methods, safety is very important so first some safety
tips.
•
Always work in a clean and tidy area.
•
Fiber offcuts are hard to see and can easily penetrate the skin especially if they get into your
clothes, so care must be taken to ensure the safe disposal of all offcuts. Dispose of fiber scraps
immediately using a suitable container and do not throw into a waste paper bin.
•
Because of the dangers of ingesting a fiber, do not eat or drink in the termination area.
•
Observe manufacturers recommendations when using solvent based adhesives.
•
Never look into the end of a live fiber connector. Holding some multimode fibers up to a piece of
paper may prove the presence of light and therefore prove that it is live, but it doesn't prove that it
isn't live! Some laser powered equipment use light which is outside of the visible spectrum, so err
on the side of caution.
On to the lesson . . . . . .
also environmental conditions to take into consideration, but for the purpose of this
tutorial we will discuss the cold cure method as it is the most widely used system
and probably the easiest to learn. It is also preferable on site as it doesn't require a
power source for ovens and fusion splicers.
As with all fiber termination methods, safety is very important so first some safety
tips.
•
Always work in a clean and tidy area.
•
Fiber offcuts are hard to see and can easily penetrate the skin especially if they get into your
clothes, so care must be taken to ensure the safe disposal of all offcuts. Dispose of fiber scraps
immediately using a suitable container and do not throw into a waste paper bin.
•
Because of the dangers of ingesting a fiber, do not eat or drink in the termination area.
•
Observe manufacturers recommendations when using solvent based adhesives.
•
Never look into the end of a live fiber connector. Holding some multimode fibers up to a piece of
paper may prove the presence of light and therefore prove that it is live, but it doesn't prove that it
isn't live! Some laser powered equipment use light which is outside of the visible spectrum, so err
on the side of caution.
On to the lesson . . . . . .
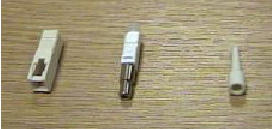
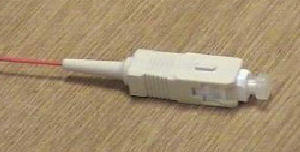
The Connector
There are three parts to a fiber connector (four if you count the dust cap) they are: The connector housing, the
connector body and the strain relief boot.
The body contains the ferrule which aligns the fiber
perfectly for mating with another connector, it's a precision
engineered component. The housing contains the fiber body and provides the latching mechanism. The
strain relief boot prevents the fiber from bending past the critical point at which it can break.
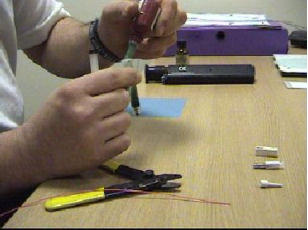
Preparation
Fill the syringe with adhesive ready to use. Strip back the external sheathing of the cable using
a rotary stripping tool.
Cut back the aramid strength member using ceramic
or kevlar scissors.
Slide the strain relief boot onto the fiber to be
terminated.
Strip the primary buffer from the fiber using fiber
strippers not ordinary wire strippers.
Do this a small section at a time to prevent the fiber breaking, about 10mm (3/8 in) on each cut is fine
until you get used to it. Strip back about 30mm (1.25 in).
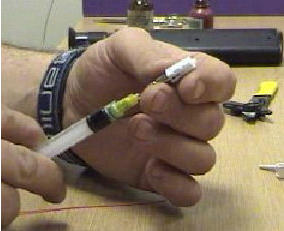
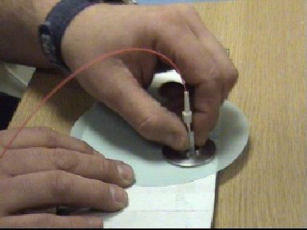
"Sticking" on the connector!
Inject the adhesive into the connector body until a small
bead appears at the end of the ferrule.
Clean the bare fiber with a lint free wipe and isopropyl
alcohol, it will "squeak" when it is clean.
Apply the primer to the bare fiber either with the brush
supplied or by dipping it into the bottle.
Push the fiber in to the connector body in one smooth
action until you feel the buffer reach the back of the
ferrule.
The chemical reaction between the adhesive and the primer happens almost instantly so don't stop while
inserting the fiber otherwise it will stick before it is fully home.
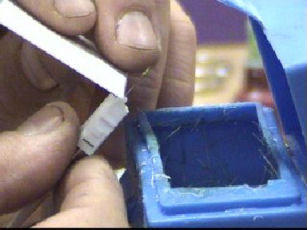
Cleaving
The purpose of cleaving the fiber is to ensure that it
breaks cleanly at 90 degrees, although you may
think that because it is ground down to the ferrule
and then polished it wouldn't make any difference if it
were just snapped off! It makes a big difference. If
the fiber shatters or splinters down past the ferrule
then no amount of polishing will turn it into a good
connection. A hand held scribe or pen cleaver is
adequate for this job, unlike fusion splicing where a
perfectly cleaved end is essential for a good
connection.
Lightly scribe the fiber as close to the ferrule as
possible and use a slight tug to break the fiber end away. Dispose of the fiber off-cut immediately in the
hazardous debris container.
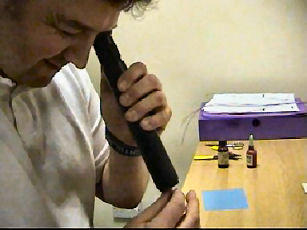
Polishing
The first step in polishing is to take the fiber down to
the ferrule, for this we use about a 9 micron lapping
film. Hold the connector in one hand and rub the nub
of fiber down to the ferrule with the lapping film.
When it is close enough you will feel it get smoother.
Step two. Insert the connector into the polishing
puck, this keeps it perpendicular to the polishing
surface. Place a sheet of 2 micron lapping film on a
suitable flat surface.
Hold the connector and puck, and place it on the
polishing surface. Then move it in a figure of 8
pattern about 30 times using slight pressure. The end is now polished and can be inspected with the
microscope. Some people recommend 3 or 4 stages of polishing but we find that we get just as good
results from just these two grades of abrasives.
Visual Check
Using the illuminated microscope check that the
polished end is OK. Things to look out for are
excessive scratches or remnants of the epoxy
adhesive. You can now fit the housing and dust
cap.
Testing
Once both ends are terminated the fiber can be
tested. Fiber testing used to involve a bulky OTDR
(Optical Time Domain Reflectometer) operated by a geek with a degree in optical physics, but these days
a simple hand held light source and power meter can be used. To give it a full test you can also use a
fiber certification tool which simply tells you what
systems the fiber is good for. These simple to use
(but quite expensive) instruments will give a print out
of all test parameters and losses as well as the
communications media it will work on.
Terminating a Fiber Optic Cable . . .